
Cascading a ZHC unit with another ZHC unit
-
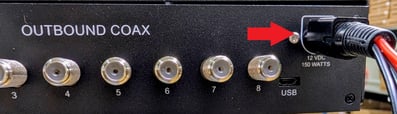
Install the new ZHC into the rack in the IDF. Power up the ZHC by plugging in the power supply connector to the rear of the ZHC unit.
-
Plug in the power supply to the outlet. Watch the front panel LED indicators.
-
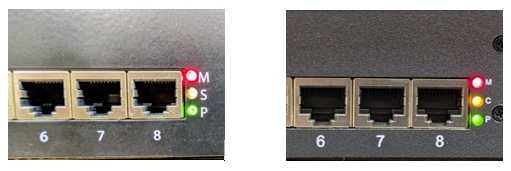
If all three LEDs are lit as shown below, the unit is in "Native" mode and is ready to proceed to connecting to the other ZHC. The letter by the amber LED has been changed from "S" Satellite to "C" Cascade in newer versions.
-
If the unit is not in "Native" mode but it is set to Main mode refer to article "How to perform an input type override" to adjust the input type with software.
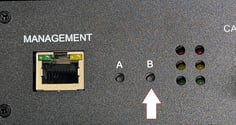
If the unit is not in "Native" mode and it is set to Satellite/Cascade mode you will need to go to the rear of the unit and push the recessed "B" button for 10 seconds. This will place the unit in "Native" mode.
-
Locate the ZHC unit that is displaying a lit red LED beside the "M" and lit green LED beside the "P" on the front of the unit. That indicates that it is the "Main" unit. On the ZHC "Main" unit, toggle the "B" button to turn on the "Pilot Tone". The amber LED beside the "B" button should turn on. This will turn off after 8 hours.
-
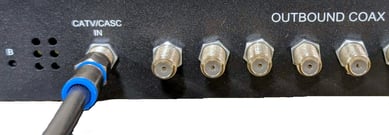
Using a high quality RG-6 coaxial cable that is at least 6 inches in length, connect one end to an empty OUTBOUND COAX connector on the main unit. Connect the other end to the CATV/CASC IN connector on the new ZHC unit.
-
The LEDs on the front panel of the new ZHC unit should change from "Native" mode to "Cascade" mode. This is indicated with the amber and green LEDs being lit. On the rear of the new ZHC, the green LED should be flashing for 20 minutes. After 20 minutes, the green LED will go out and the unit will lock into "Cascade" mode by displaying a solid red LED. The unit is then ready to be utilized.
Cascading a ZHC unit with a GigaBUD Video Hub 1000
-
Install the new ZHC into the rack in the IDF. Power up the ZHC by plugging in the power supply connector to the rear of the ZHC unit.
-
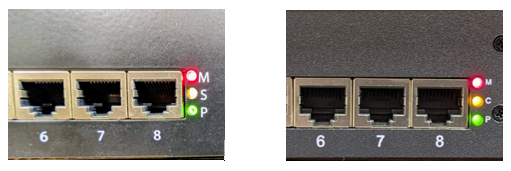
Plug in the power supply to the outlet. Watch the front panel LED indicators. If all three LEDs are lit as shown below, the unit is in "Native" mode and is ready to proceed to connecting to the other ZHC. The letter by the amber LED has been changed from "S" Satellite to "C" Cascade in newer versions.
-
If the unit is not in "Native" mode but it is set to Main mode refer to article "How to perform an input type override" to adjust the input type with software.
If the unit is not in "Native" mode and it is set to Satellite/Cascade mode you will need to go to the rear of the unit and push the recessed "B" button for 10 seconds. This will place the unit in "Native" mode.
-
Locate the Video Hub 1000 that is displaying a lit red LED above the "Master" and a lit green LED above the "Power Status" on the front of the unit. That indicates that it is the "Master/Main" unit.

-
If the LED to the right of Power Status is green, you will have to turn on the pilot tone. If the LED is amber, the pilot tone is on and you can skip forward.
-
On the rear of the "Master/Main" unit, You will see a red button. Press and hold the red button for 5 seconds. The LED for the pilot tone will change from green to amber. This indicates the pilot tone is on.

-
Using a high quality RG-6 coaxial cable that is at least 6 inches in length, connect one end to an empty OUTBOUND COAX connector on the "Master/Main" unit. Connect the other end to the CATV/CASC IN connector on the new ZHC unit.
-
The LEDs on the front panel of the new ZHC unit should change from "Native" mode to "Cascade" mode. This is indicated with the amber and green LEDs being lit. On the rear of the new ZHC, the green LED should be flashing for 20 minutes. After 20 minutes, the green LED will go out and the unit will lock into "Cascade" mode by displaying a solid red LED. The unit is then ready to be utilized.
-
On the rear of the "Master/Main" unit press the red button for 5 seconds to turn off the pilot tone. The LED on the front of the unit should change from amber to green. This indicates that the pilot tone is off.
Cascading a ZHC unit with a GigaBUD HD860
-
Install the new ZHC into the rack in the IDF. Power up the ZHC by plugging in the power supply connector to the rear of the ZHC unit.
-
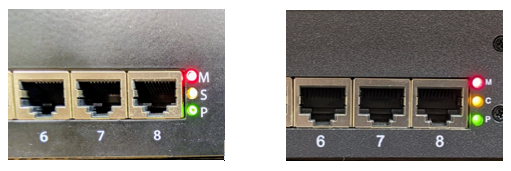
Plug in the power supply to the outlet. Watch the front panel LED indicators. If all three LEDs are lit as shown below, the unit is in "Native" mode and is ready to proceed to connecting to the other ZHC. The letter by the amber LED has been changed from "S" Satellite to "C" Cascade in newer versions.
-
If the unit is not in "Native" mode but it is set to Main mode refer to article "How to perform an input type override" to adjust the input type with software.
If the unit is not in "Native" mode and it is set to Satellite/Cascade mode you will need to go to the rear of the unit and push the recessed "B" button for 10 seconds. This will place the unit in "Native" mode.
-
Locate the GB "HD860" that is displaying a lit red LED above the "Master" and a lit green LED above the "Power Status" on the front of the unit. That indicates that it is the "Master/Main" unit. The pilot tone on the "HD860" is always on so you do not need to do anything to the "Master/Main" unit.

-
Using a high quality RG-6 coaxial cable that is at least 6 inches in length, connect one end to an empty OUTBOUND COAX connector on the "Master/Main" unit. Connect the other end to the CATV/CASC IN connector on the new ZHC unit.
-
The LEDs on the front panel of the new ZHC unit should change from "Native" mode to "Cascade" mode. This is indicated with the amber and green LEDs being lit. On the rear of the new ZHC, the green LED should be flashing for 20 minutes. After 20 minutes, the green LED will go out and the unit will lock into "Cascade" mode by displaying a solid red LED. The unit is then ready to be utilized.